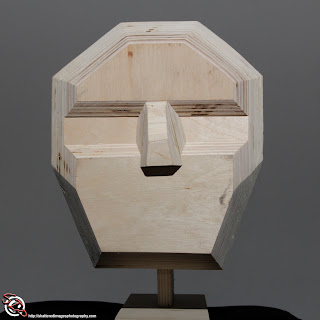
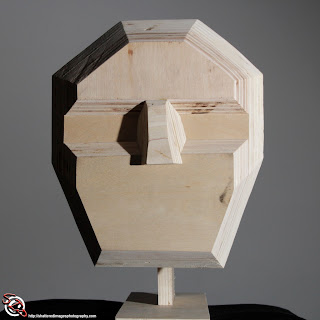
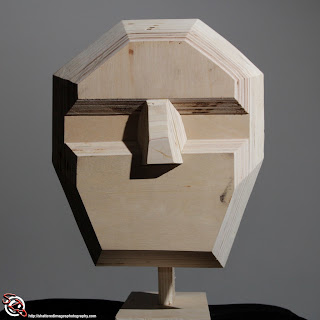
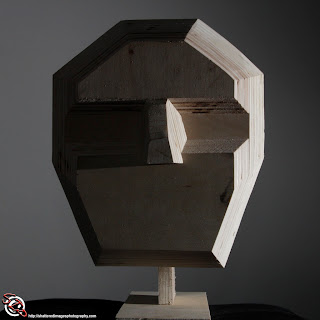
This is a continuation from last weeks blog, in this installment we are going to look at how light direction effects your image. For this series of images I was shooting with the Canon EOS 60D camera with the 28-135mm f3.5-5.6 USM Lens set 44mm, the aperture was set to f8, the ISO to 800, and the shutter was set at 1/250th. The camera was placed on a tripod and located 3' in front of the subject. The subject was 6' from a white wall which served as the background. The flash I was using was the Canon Speedlite 430EX-II on manual set to 24mm and 1/64th power. The flash had no modifier, and was located 3' from the subject. These setting for both the camera and flash were constant for all six exposures, the only element that changes is the direction the light is falling on the subject. Sitting in for the subject for these images was "The Face" a plywood cutout I hacked together, though a clay mask or mannequin would also make a great subject. These objects are a better stand in when you first start experimenting because they do not move, ergo the only differences will be caused by the placement of the light.
 |
| Flat Lighting |
 |
| Butterfly Lighting |
 |
| 45 Degrees Camera Right |
This third image was created by moving the flash 45 degrees to camera right, in this image the flash was on the same plain as it would be when mounted to the camera. As a general rule portraits are not shot with the light positioned here as the shadow cast by the nose tends to make the nose look wider.
 |
| Loop Lighting |
This fourth images is an example of "Loop Lighting", the name is derived from the loop shaped shadow cast by the nose. This style of lighting is very common in portraiture, it tends to be the most flattering for the widest audience, particularly if you use softer light and add some fill both of which will help to even skin tone, hide blemishes and reduce the appearance of wrinkles. It is also closely related to Rembrandt Lighting which I will cover In depth in a later blog entry.
 |
| Split Light 90 degrees camera right |
 |
| Split Light 90 degrees camera right up 30 |
These last two images are examples of Split Lighting. In this style of lighting the light comes in to the subject from 90 degrees, effectively splitting the face into a lit side and a shadow side.
It is important to note that for most of the lighting styles mentioned here the direction the light falls on the subject is much more important then the placement of the light relative to the camera. For instance, if you are stuck with a point and shoot camera and you have to use on camera flash, having your subject turn their head thirty degrees to the side and tilting their head towards the camera will use the on camera flash as Loop Lighting. This will add some definition to the shape of the face, with a little practice you can help your subject further by twisting their shoulders slightly so you can elongate the neck to eliminate excess chins. In this manor a photographer can make up for some of the limitations of having to use on camera flash.
At this point some of you are probably wondering why I have written three blog entries on lighting but I have yet to talk about "proper exposure". In general proper exposure is considered to be exposure for the mid-tones, however if you are shooting low key photography most of your image will be very dark to black and little of the mid-tones will actually be exposed. Also, above I made general statements about when certain lighting styles tend to be used, but I have not referred to any of them as "proper" (with the exception of mentioning trying to avoid Flat Lighting), nor did I make that kind of judgment in the previous article on hardness. In all of these cases what is "proper" depends entirely on your vision as an artist, including the use of Flat Lighting. In all of these cases you should make it a conscious decision to use a specific style quality and intensity of light.
I will say though, having sufficient contrast is important, that is the range from light to dark. What is a frequent mistake in photography, particularly in interior ambient light, will be the presumption that no flash is better then on camera flash. A person will opt to turn the flash off because there is enough light to shoot without it. But this is usually the case in buildings with lots of strip lighting. Everything is lit very uniformly and the dynamic range for the entire exposure may only be about half a stop. This lighting is ok for our day to day existence since we are seeing that environment with two eyes, but seen through the lens of a camera the image will end up being very muddy. Turning on your flash, using it at low power and letting it be a little bit of a kicker for an ambient exposure can do a lot to combat what would otherwise be a waste of a shutter release even though it is "properly exposed". Adding flash will add contrast which will ad pop to what would otherwise be a blah image.
This should give you a couple of more tools to add to your photography trick bag. Good photography can be daunting, but if you break it down into digestible pieces you can really start to get a good handle on what you are shooting.

Follow Us
No comments:
Post a Comment