Sunday, February 24, 2013

Shooting in Low Light


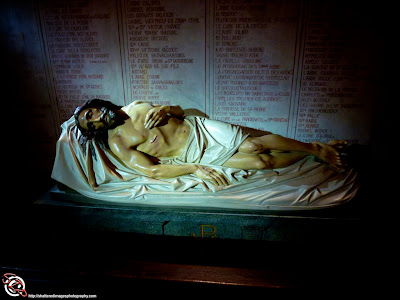
Crypt - Notre Dame de la Gurde
24mm ISO 200 f3.3 1/30th no flash
Getting good photos in low light can be one of the biggest challenges photographers face. Low light photos require longer shutter speeds larger apertures and higher ISO to get proper exposure, and all of these add their own challenges to the photo. In an ideal world you would have a camera with a large sensor and fast lens to help correct these issues, but lets face it, even those of us that are professionals and “have all the gear” don’t really have all the gear for every situation. We also commonly find ourselves in a situations where we only have basic gear with us because we did not know this opportunity would arise to get this photo.

Lets first look at the challenge of a longer shutter. Shutter speeds over 1/60th start to show camera shake, possibly faster shutters will if you are zoomed in on your subject. Motion blur will also be an issue, and can be even if you can get speeds as high as 1/250th, depending on what your subject is. A couple of options you have to combat camera shake are the use of a support and the use of your time released shutter. If a tripod is available it is the best option as they provide very good support which will eliminate movement of the camera, but you wont always have one, and some places do not allow their use. Learning to brace your camera against your body, elbows in and pulled against the ribcage or squatting with your elbows resting on your knees will help steady the shot. Often the depressing of the shutter release can be enough to introduce shake even when in positions that offer better support. Many cameras have a timed release that can be set to 2 or 10 seconds, use of this delay will eliminate those issues.

Of the three setting on your camera the one that is the easiest to use in low light is a large aperture. Its only real challenge is providing a deep enough field of focus for your subject, the depth of field is increased by moving back from your subject and then zooming in with the camera lens or by cropping the image later on a computer. Todays cameras with megapixel ranges above 12 offer plenty of room to crop. But you can still face other challenges here. Many lenses have a variable aperture, that is the aperture will be something like f3.5 at 18mm but as you zoom in to your subject the aperture drops to f5.6. This means digital cropping later may be your only option for having a deep enough field of focus.

ISO speeds can be the most challenging aspect of low light photography. To the novice ISO will often look like the easy fix and it will be their, or their cameras, response to low light. After all higher ISO lets you shoot in lower light, however this can quickly introduce noise, while a little bit of noise is not that detrimental to an image a lot of noise can destroy it. True there is noise reducing software but it can be expensive and difficult to use effectively. Fortunately newer cameras are better at recognizing and correcting for noise, and if you are shooting with a DSLR it has a larger sensor which is less susceptible to noise. But really the solution for this is experimentation. Shoot a lot of things in low light on different ISO settings and find out what your noise threshold is and what ISO settings are below it. Use these ISO settings and correct the exposure from there with aperture and then shutter speed.

In “The BIG 3” I mentioned that there is really a 4th option - the addition of more light. Generally this will be a novices solution too, turn the flash on. On camera flash is one of the quickest ways to ruin a good photo (I will go into that more when I write about lighting) but also in many places it is not allowed or at the least can be rude - in a cathedral for example. The photo above was shot in the crypt below Notre Dame de la Garde with a Panasonic DMC-ZS10 with available light. The aperture was f3.3 and the shutter was 1/30th of a second, while the ISO was set for 200. This is not a camera with a large sensor or a particularly fast lens, but by bracing the camera on a rail and using the 2 second delay on the time release settings for the shutter I was able to get a very nice image, just with available light coming in from the entrance. This was shot in jPeg and the only post work was the addition of a vignette to help push attention to the sarcophagus.

Conversely when working in a studio it is possible to fake low light. This has the added benefit of allowing the use of camera setting that are normally only available in daylight like conditions (again I will go into this in much more depth later) but the short version is by adding light, usually off camera, you can eliminate the issues of high ISO, large aperture, and fast shutter, but by using light settings that are “under exposed” according to the light meter and then playing with the color temperature settings of your camera you can create the illusion of shooting under candle light or moonlight while using a shutter of 1/100th an aperture of f9 and an ISO of 200.


Follow Us

FaceBook
https://www.facebook.com/pages/Shattered-Images-Photography/274273146947

Twitter
http://twitter.com/Shatteredimages

Website
http://shatteredimagesphotography.com/index.html

Sunday, February 17, 2013

Photographing Breaks


5 Brick Break
5 Brick Break
When photographing martial arts one of the trickiest things to master is getting good pictures of breaking. Here are a couple of pointers that will help. First, timing is paramount and for this reason mastering focus lock is very important. And second it is important to have a fast exposure setting, a fast lens can really help with this and so can the use of flash.

Lets take a moment and look at timing. Timing is having the camera expose at the instant it is needed. If the camera fires to soon the shot will be missed, either the break wont have happened yet or it wont have completed, only part of the bricks or boards will have broken giving the appearance that the break failed. If its to late the person will be standing over a pile of rubble and there will be a cloud of dust, the shot will have been lost. Using focus lock can help alleviate timing issues - especially late exposures. 

When you fire a camera with autofocus you have probably noticed a slight delay from when you decide to take the picture to when the shutter releases. This is because the camera needs a moment to focus. There are a couple of work arounds. On some cameras it is possible to switch to manual focus. However I find focus lock to be the better option. Focus lock occurs in all autofocus pictures, and it is what causes the slight delay in the shutter, causing the shoot to be lost. When the shutter release is depressed the camera focuses on the selected focal point, once focus is achieved the shutter actuates. By depressing the shutter halfway you tell the camera to focus but not fire, once the camera achieves focus it then holds that setting, that is the focus is locked as long as the shutter is held halfway. As I mentioned the camera always does this with autofocus it is just we don’t notice it because we don’t hold it there, in most cases we just fire the camera. With a bit of practice you will find yourself using this technic a lot as you quickly focus the camera, compose the shot, and then release the shutter - and in action photography it will allow you to have the camera ready for the exact moment the action happens.

Fast exposure settings - this should be obvious with a slow exposure you are just going to have a big blur, but how do you get them. The easiest solution is the addition of flash. The addition of more light allows a faster shutter. And in most cases, with the addition of flash, the camera can be set so the ambient light does not effect exposure allowing the burn time of the flash to be the effective shutter speed. In most cases this will give effective shutter speeds around 1/500th to 1/1000th of a second allowing for tack sharp images. A fast lens is also an option to help get faster exposures. Fast lenses have low f/stops 2.8 or below with 1.4 and 1.2 being considered fast. The draw back to this is the shallow depth of field will make proper focusing all the more important. Fast lenses tend to be expensive and with the exception of shooting in sunlight it is unlikely to get shutter speeds as high as 1/250th which is still a bit slow for shooting action. These drawbacks make the addition of flash the best option for action shots.

One last thing, I would avoid spray and pray shooting - that is the use of high frame rates. Most cameras just don’t shoot fast enough and the action will get lost between frames. The Canon 7D can shoot a respectable 7.3 fps some new cameras even manage 10fps making it more likely that an acceptable image will be captured, however your strobe will never keep up, greatly limiting shutter speeds. Also breaking happens so fast it is very likely you will have an image before impact, one after, and still have missed the moment of impact. It is better to invest a little bit of time learning the skills to shoot action. This can be applied to any action, someone breaking bricks or someone pitching a baseball. Learn the timing to get the ball just as it rolls off of the pitchers fingers and you will have the skills to get a break just as the last block crumbles. Just remember there is some travel time between the first brick breaking and the tenth. The timing for a single brick is slightly different from that of a stack.

So as a quick recap. Using focus lock will allow you to compose the image and release the shutter just as it is need. Without focus lock the shot will be too late as you wait for the camera to focus or to soon as you press the shutter early trying to anticipate the moment. Adding flash will allow very fast effective shutter speeds allowing tack sharp images. Mastering these two things will allow you to capture some phenomenal moments, moments that would otherwise be “lost like tears in rain”.


Follow Us

FaceBook
https://www.facebook.com/pages/Shattered-Images-Photography/274273146947

Twitter
http://twitter.com/Shatteredimages

Website
http://shatteredimagesphotography.com/ma_index.html

Sunday, February 10, 2013

Canon 60D - Equipment Review


Canon EOS 60D
Canon EOS 60D
A good little work horse the 60D has been the camera I have primarily shot with since I purchased it in March of 2012. Most of my shooting is in studio for clients that want images smaller then 24”x36” and as such I have not needed the expense of full frame cameras. While I absolutely love the 7D I have been able to save the more expensive body from excessive wear and tear by using less expensive bodies in studio. Prior to the 60D I shoot through three 20D bodies over the last eight years that I have worked professionally.

There are a couple of features introduced to the 60D that are really convenient, the switch to SD memory and the articulated LCD screen. The change to SD format over CF format is just easier since most computers have SD slots built in and Eye-Fi is only availably in SD. This just makes transferring images to computer more convenient. This is a slower format to write to and does limit the cameras burst speeds. The moveable LCD makes shooting at odd angles easer, you no longer need to lay on the floor to get low camera angles and you can see what you are shooting when you are holding the camera above your head (which can be helpful shooting in crowds).

And now for a few things I am disappointed with. The real strike against the 60D as part of the X0D line is the switch to a plastic body instead of the magnesium alloy body from the previous cameras in this line. I still feel that the build of the 60D is superior to the Rebel line but it is still very disappointing to not have the higher quality body that had been a hallmark of the X0D series. It is also disappointing that the 60D will only support 2 flash groups. I believe both of these decisions were made to push the more serious photographers into the more expensive Canon lines.

There are a few other options that are not appealing to me. I would prefer multiple custom setting to the presets for night, landscape, portrait, sports, etc. The 60D only has 1 custom spot on the dial compared to 3 on the 7D. I miss having the one shot RAW option that is available on the 7D, I really believe RAW should be saved for when it is needed, too many shooters rely on it instead of taking an extra moment or two to correct the shot before the shutter is released. Also many other shooting presets are buried in the menus instead of being readily available on the back of the camera as they are with the 7D making changing to adapting shooting needs a longer slower process. 

The 60D also has more “styles” built into the electronics of the camera including conversion of RAW to JPEG. All of this strikes me as a bit gimmicky, these conversion can be done with much more precession on the computer I really do not see a point in them on anything beyond point and shoot cameras. Options that can be fun for people that are not invested in post production software really do not have a place on cameras aimed at people who are.

I know it seems like I had a lot of negative things to say about this camera, but it IS a good work horse and can very easily be an affordable back-up body, or as in my case main body allowing the more expensive body to be saved for when it is needed. At less than $900.00 it can also make a very good entry level DSLR making it much easier to afford some quality glass than the more expensive 7D or 6D bodies.


Follow Me

FaceBook
https://www.facebook.com/pages/Shattered-Images-Photography/274273146947

Twitter
http://twitter.com/Shatteredimages

Website
http://shatteredimagesphotography.com/index.html

Sunday, February 3, 2013

How to Sponsor a Successful Martial Arts Photo Shoot


Composite image of Miss Dani N.
Miss Dani N.
Martial Arts has been a favorite photography subject of mine for many years, as such I have photographed martial arts schools on many an occasion. Here are a few pointers to consider if you are planing on hosting a photographer for your school.

Get a photographer that knows martial arts. This should go without saying, but someone who specializes in family portraiture just is not going to be familiar with what martial arts should look like. They will have difficulty understanding why you are not thrilled with shots that are correct from a technical stand point but that do not really capture the essence of martial arts - because they do not understand that essence. Ideally find one that has studied martial arts AND has experience photographing it.

Be excited about the up coming shoot. Put the promotional material up on the school bulletin board, announce it frequently, put it in the newsletter, send out email announcements, promote the Facebook event, if the photographer does not make an event make one yourself. If you are excited about the up coming shoot then your students will be too.

Keep the students grouped together, if at all possible host the shoot during class time, then the students will already be used to being there. Nothing can make a shoot drag on like only having 2-4 students an hour. A good photographer will have great time management skills and will easily be able to help 8-10 students an hour get good quality photos.

Help the students choose 2-3 poses before the day of the shoot. All to often a student comes up for a photo and when I ask “what would you like to do?” the response is “I don’t know.” what are you good at “I don’t know” do you want to do a punch a block or a kick “I don’t know....” Some poses work really well for photos: front kick, side kick, round kick, most anything in a good front stance or back stance. Help the student to choose a couple of three that is within their skill level and the shoot will flow much more smoothly. This way the photographer will be able to spend their time positioning the student at the best angle for the camera and the lights AND spend time helping you choose from 2 or 3 great shots instead of spending time trying to come up with a pose that the students want and is capable of doing. Remember you know your students skills, the photographer is likely just meeting them for the first time.

When possible cancel classes during the photo shoot or let the photographer set up in a separate space from where classes are being held. I understand the importance of keeping an active class schedule for students, but martial arts classes are very loud, it makes it difficult for the student to hear the photographer and can really make getting good photos, particularly of tiny tigers that are easily distracted, a real challenge.

Scheduling a photographer that really knows and has a passion for martial arts, being excited about your shoot and helping students pick poses are are important to a great turnout and epic photos. While minimizing distractions and limiting down time can really help that shoot to run smoothly. These are just a few things that can help turn a good shoot into a great shoot.


Follow Us

FaceBook
https://www.facebook.com/pages/Shattered-Images-Photography/274273146947

Twitter
http://twitter.com/Shatteredimages

Website
http://shatteredimagesphotography.com/ma_index.html