Sunday, September 29, 2013

What is High Speed Sync?

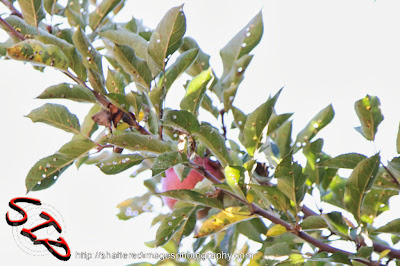
1/3200th w/ High Speed Sync

High Speed Sync is a dedicated flash camera function that allows the photographer to use flash in situations where the lighting requires a shutter speed that would otherwise prohibit the use of flash. 

Ok that statement is a bit high on the techno speak, so lets look at it a bit differently. In most flash photography shutter speed is pretty irrelevant, the lighting situation is such that the ambient light leaves little or no impression on the sensor and the flash dictates both the exposure and acts to freeze the action. In photography without flash the aperture is used to control depth of field while the shutter acts to control action - a slow shutter shows motion blur and a fast shutter freezes objects in motion. With flash photography even in cases where you are blending with ambient light the flash will still have a tendency to freeze action. This happens because the short, high intensity burn of the flash acts as the effective shutter speed, usually somewhere around 1/1000th of a second depending on flash output.

I mention this because it can be easy to forget if you do not regularly shoot in situations where it is necessary to shoot outside of the cameras sync speed. When the flash is freezing your action for you it is easy to forget that the flash does not function with the camera at shutter speeds above the camera sync - for most cameras this will be 1/250th of a second, though for the EOS 6D that speed is 1/180th. To find your Camera’s sync speed you will need to check the camera's user manual.

Ok since we have established that flash freezes action and it is therefore not necessary to use the shutter to do that then why do you need to be able to use flash with a shutter set above the sync speed? Well sometimes the ambient light you are blending with is just too bright for your camera’s sync speed, this generally means you are shooting in sunlight. 

Second Curtain Closing
To understand this a little better it lets take a moment to look at how the shutter functions. At and below sync speed the first curtain of the shutter opens completely before the second curtain starts to close, this allows the entire sensor to be exposed at once. At speeds above the camera’s sync speed the second curtain starts to close before the first curtain has fully opened, at higher speeds only a partial strip of the sensor is being exposed at any given moment.

High Speed Sync changes the duration of the flash burn. Instead of the flash firing once the first curtain has cleared the shutter the flash fires a series of pulses and burns for the entire duration of the shutter action. This function allows the flash to be lit for every section of the sensor without the second curtain blocking part of the sensor which happens if the flash fires a single burst.

The Image at the top of the post was photographed using High Speed Sync. That image was taken at 1/3200th of a second, well out side of the camera’s normal sync speed. The next two images show the scene without flash, the first at 1/180th of a second which exposed the apple nicely but completely blew out the sky, the second at 1/3200th which was the speed needed to get proper exposure of the sky but it crushed the apple in shadow leaving it and the leaves quite dark. It would be possible to create an HDR of this scene, but for HDR you really need to be shooting still life. High Speed Sync can create the image in a single exposure and allows blend flash with sunlight, something the regular sync speed does not allow.
1/180th no flash
1/180th no flash

1/3200th no flash
1/3200th no flash

* Note not all flashes and cameras support High Speed Sync though it is available on Canon, Nikon, and Sony Alpha lines, as well as being supported by some third party flashes. You will need to consult both your camera and flash manuals to see if High Speed Sync is an option for you.


Follow Us


Sunday, September 15, 2013

Photographing Sports


Photographing sports can be challenging for the beginning photographer. A couple of different approaches can be used to help get great images. In An 18% Grey World I wrote a bit about how the camera makes the decisions it makes, if you have not read that post yet it would be good to look over it now. When approaching sports photography there are three different approaches you can use.

Your first option is full automatic letting the camera make all the decisions on exposure. If your camera does not have a sports setting in its full auto array this tends to be the worst of the three options. Even in bright sun the camera will operate with lower shutter speeds so that it can keep the ISO low and the Aperture high giving the camera the biggest depth of field. In general full auto will always have motion blur, a lot of motion blur as it will keep your shutter between 1/60th and 1/250th of a second. The sports setting, if your camera has it, will help do a better job as it will tell the camera to try and keep the shutter at 1/250th or higher, greatly reducing the amount of motion blur. This will be your best option if you are using a point and shoot camera.

The next option is to use shutter priority or Time Value. Many photographers recommend this approach as the camera tries to maintain your preferred shutter while still judging exposure. It is important to remember that while you set the shutter this is still an automatic setting for the camera, many cameras will only give preference to the shutter speed you have selected. This means that while you may have told the camera you want a 1/500th shutter it may drop you to 1/60th if the meter tells the camera it is 3 stops under exposed, this can be very problematic especially if the camera is spot metering the scene, but even in evaluative metering the camera can still drag your shutter speed down to far for shooting sports. Some cameras allow you to turn off the Safety Shift or switch it to shifting the ISO to prevent the camera dragging the shutter.

My preferred option is shooting in full manual mode, this insures that I can keep the shutter speed high enough to capture the motion the way I want to show it. There is a bit more work associated with shooting this way if you are shooting in a changing light environment. However unless your subject is moving in and out of bright sun and extremely harsh shadows the change in exposure will only be a couple of stops. The other time you can see a big shift in light is when photographing a game that starts before sunset and continues into the night. In this latter case the exposure shift is much more gradual and is easy to compensate for as long as you pay attention to your shooting conditions. 

A brief run down of how I approach this shooting situation. If I am shooting sports in daylight I set the camera to f8 ISO 800. In bright sun this allows me a shutter speed of 1/1600th (Sunny 16) certainly fast enough for hand holding the camera at any focal length and freezing most action. Even if clouds are moving in and out from in front of the sun I can shift two stops in the shutter and still maintain a shutter speed of 1/400th Again this will allow me to hand hold a telephoto lens and still freeze most of the action. When shooting at night I set the camera (EOS 7D) to ISO 6400 and the shutter to 1/500th with the aperture set to the maximum aperture for the lens at its longest focal length. Many lenses have a variable aperture which will be something like f3.5-5.6. For this kind of lens I would set the Aperture to 5.6.

A few other things to keep in mind. 
  • Blur becomes much more apparent the longer the lens you use. If you are shooting with an 800mm lens then the motion blur of your subject will become more apparent and you will need a faster shutter to get tack sharp images. 
  • The same holds true for camera shake. As a general rule to eliminate camera shake the shutter speeds needs to be equal to or faster then your lens length. A 60mm lens can be hand held at 1/60th of a second, an 800mm lens can be hand held at 1/800th. An image stabilized lens will generally get you one stop of shutter speed, meaning an 800mm IS lens could be hand held at 1/400th.
  • Post production of RAW images can recover 3 or more stops in your image provided you don’t have blown highlights. What this means for shooting sports at night is you can recover a lot from what the camera considers under exposed. As long as you do not have an extreme amount of clipping in your shadows shoot the faster shutter speeds to eliminate blur and bring the images back in post.
  • If you can not shoot in RAW set the camera’s auto-light optimization to high and it will do the same thing for you by recovering shadows as it saves the image to Jpeg, allowing you to favor shutter over “correct” exposure.

* This post is written using the terms Canon uses, most manufactures have these options though sometimes under a different name. 


Sunday, September 8, 2013

Canon 580EX-II - Equipment Review

Canon 580EX-II
Canon 580EX-II

The 580EX-II was the top of the line Canon Speedlite until the release of the Canon 600EX-RT. For many shooters the release of new equipment opens opportunities for them that had not been practical before as older equipment re-enters the market at 1/3 or even 1/4 of original cost. For many shooters this will allow them the option of adding a powerful E-TTL II flash to their kit that can also function as a master controller for their existing 430EX-II or other Canon Speedlites. 

Many other shooters will be wondering if the 600EX-RT is a better option. Lets take a brief look at that first. Both the 580 and the 600 are capable as functioning as an optical master for the existing Speedlite lines, while the 600 is capable of controlling 5 flash groups and the 580 only controls 3 in optical mode the 600 is also limited to 3 flash groups. The rational behind this limit was probably limit of the older flashes to groups A thru C, however it would have been nice to have the option to use older units in those groups and use 600s in the D and E group in an optical controlled system. The short of it is to gain the added advantage of 600 series flashes at this point in time all flashes have to be 600 series making that set-up much more expensive then using a 580 master with other 580 and 430 units as slaves. Used 580s are now comparable in price to new 430s which makes adding a used 580 to the mix an attractive option.

For shooters that are already using cameras like the 60D and 7D which offer master controller function through the pop-up flash paying an additional $550 for a new 580EX-II was probably not an attractive option. Now you really should consider picking one up used in the $200 dollar range, this is why. The 60D and similar model cameras while capable as acting as a master controller were limited to flash groups A and B by using a 580 as your master controller you now have access to group C as well creating much greater freedom when using speedlites for 3-Point Lighting. For the higher end cameras that already supported all three flash groups the big advantage to having an on camera 580 is when you are controlling flash groups with the camera oriented to portrait format. The common problem the pop-up unit encounters in shooting in this fashion is putting some of the off camera flashes into the shadow of the lens which prevents them from firing. The larger surface of the 580 unit along with the ability to orient it in different directions can allow all of the flash units to easily see the master unit. 

If you are using a higher end camera like the 6D a pop-up option is not available and a 580 is a very affordable option. While it is true that ST-E2 units can be purchased new in the same price point as used 580s, the big advantage of a used 580 is that it gives you one more flash unit. Even with this unit mounted on camera it can provide fill light or be used as a Bounce Flash.

The 580EX-II is still a very relevant option for most shooters. It is a powerful reliable choice and when it comes to the use of other optical units it’s price point makes it a superior choice to the 600 Series.


Follow Us


Sunday, September 1, 2013

Blending Flash with Ambient Light


Lighting Set-Up
Lighting Set-Up
Mixing strobes with existing light seems to be one of those things that confuses many photographers. This is most likely due to the fact that two sets of photographic rules are at play when blending flash and ambient light. The first set is what natural light shooters tend to live and die by, the “BIG 3”. If you have read my earlier blog post you know that I tend to look at this set of rules as being very malleable. The second set of rules come out of studio lighting, where light is controlled by light, or by aperture if you are working with a set of strobes that are not adjustable (but even in this case you can control flash power by distance to the subject or the use of neutral density gels and not need to use on camera settings).

So where does the confusion come in? When a photographer is shooting using all natural light where they have very little or no control over the light, such as landscapes, their only recourse is to adjust camera settings. If the scene is already properly exposed and the photographer wishes to adjust shutter, they then have to adjust aperture or ISO to get an equivalent exposure. In the days of film they were really stuck with adjusting aperture or wasting the rest of a roll of film to change ISO/ASA.

When shooting under studio strobes shutter speed is almost meaningless. A simple way to demonstrate this is to set a camera up in a room on manual setting. Set the ISO, shutter aperture and flash for the exposure you want when the lights are turned off. Turn the lights off take a picture with flash and then adjust your shutter - just your shutter - and take a second image. As long as both shutter speeds are within your cameras sync speed there will be no difference in the two images. This is because flash photography has an effective shutter speed which is the burn time of the flash, in most cases somewhere around 1/1000th of a second. This effective shutter is much much faster then even the cameras fastest sync speed (for most Canons 1/250th) As long as you understand this you understand how to mix flash with ambient light.

The how too blend flash and ambient is actually quite simple. Set your scene, set your camera for an ISO you are comfortable with and set your aperture to create the Depth of Field that you wish to have and set the shutter to your maximum sync speed. Once this is done set your flash output to properly expose your subject (depending on your flash this can either be done with output, neutral density gels, or distance to subject). At this point when you release the shutter you should have a properly exposed image. If you do not adjust your flash power accordingly. 

Once you have a properly exposed image you can then mix ambient light in simply by slowing your shutter speed. Remember from the lights turned off room exercise above that shutter speed does not effect flash exposure, so the Big 3 methodology does not apply to the exposure from the flash and you do not need to adjust aperture or ISO as you change the shutter(this is where people get confused). By slowing or “dragging” the shutter all you are doing is allowing more ambient light to balance the areas of the image that are not being exposed by the flash.

So why do we blend flash and ambient light? There are several situations which can call for this, the most common is when more light is needed then is available yet we do not wish to loose the ambience such as in a club. Another common place to use flash and ambient is when photographing a person at night and wishing to have a city scape behind them visible as well. This is similar to the first but the flash is needed because the person would not expose at all, they would simple be a shadow blotting out the city lights. Another case is to freeze action, such as bullet photography, the flash is used so the bullet can be frozen in the frame and the longer shutter allows the rest of the scene to also be exposed. Another reason to add flash is to create shadows, in the sequence below you can see that the room is very evenly lit and by adding flash I added shadows which creates depth in the images. In actuality blending flash will be used for multiply reasons in the same image.

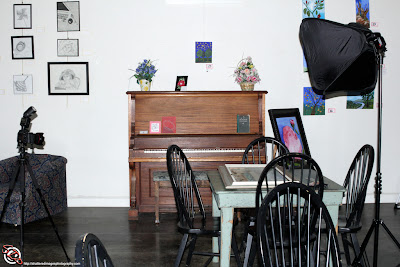
So now we have covered the theory, lets look at the nuts and bolts of what I did for this exercise and how it affected the images. Photographed at the top you can see how I set the camera and flash in relation to the scene. I treated the piano as the subject of the image, I placed the 600EX-RT on 1/4 power, into a 24” softbox, 6 feet from the piano. The camera was the Canon 6D with the 24-105 f4 L set to 24mm. The ISO was 400 and the aperture was f4 for all of the images in the following sequence the only thing that changes is the shutter speed which is listed on the images.


1/180th

1/125th

1/60th

1/30th

1/15th

These last two images below show the scene, the first with the camera set to take a flash exposure but no power to the flash, and the second with the camera set to take the image just with ambient light. The Canon 6D sync speed maxes at 1/180th which is why there is a discrepancy between the first image in the sequence above and the image here for flash with the flash turned off. In situations where you need a faster sync speed Hi-Speed Sync can be used to get speeds above your cameras sync speed. (This will be covered in a later blog.) For this example I allowed the camera to set the default shutter sync for the 1st image. I also did not correct for Color Balance, the camera was set to Flash which is why the total ambient light image has a yellow cast. I did this deliberately, in the sequence the competing colors make it a little easier to spot how much ambient light is effecting exposure. If you use AWB it will set to flash when a flash unit is attached to the hot shoe so the area exposed by the flash is closer to white. If you use gels to match your environment you will need to set your cameras white balance accordingly with the camera’s custom white balance settings. The exception to this is when using Canon CTO gels with the 600EX-RT. The 600 has a sensor which allows it to correct white balance to the Canon CTO gel being used if the camera is set to AWB. I have not explored this function yet so I am not sure how well it works. It also only works if the flash is mounted in the hot shoe.

No Flash 1/250th

Ambient Only 1/15th


So that is the basics of mixing flash with ambient, like color balance the only way to really learn this skill is through practice. Depending on your set up it is possible that if you are mixing a lot of ambient light you would need to step the flash power down slightly. Do not be afraid to experiment once you have a good grasp on how the toe exposure models work and how well they blend.


Follow Us