Sunday, June 30, 2013

Sunny 16


The Sunny 16 Rule is a guide that photographers can use to judge proper exposure settings in bright sun without the use of a light meter. The rule was developed several decades ago before there was reliable metering for cameras. The Sunny 16 Rule basically states that when using a camera in bright sun with the aperture set to f16 then the shutter and ISO should share the same reading. That is to say if you are shooting at ISO 200 you would set your shutter to 1/200th of a second.

This rule can be extended further to adapt to more lighting conditions provided you know your f-stops. For instance if you are shooting in the early morning after the sun has cleared the horizon but before about 9-10 o'clock (depending on latitude) you would open your aperture one stop to f11, this would also be your setting on hazy days. If you are photographing in the shade then the f-stop would be moved down to f8, if it is deep shade or the day is overcast you would be opening to f5.6. If it is an early morning with heavy cloud cover you may need to open the aperture as far as f4. If you wanted to photograph in BMNT or EENT then you would need a lens that could open to f2.8 or even f1.4 depending on how close you are to sunrise/sunset.

So why does a photographer that rails against the use of light meters and The Big 3 find the Sunny 16 Rule, a rule based on the exposure triangle, useful? I am glad you asked. Photography is all about understanding light. You are in fact creating an image out of light, that is what your CMOS/CCD/film plate does. I have noticed a tendency in photographers that rely on light meters and the exposure triangle to be controlled by these tools, instead of controlling the light. What I find happens is a photographer gets a reading that "tells them what the exposure is" instead of asking the question "is this how I want the light to act?" Remember that the equipment is metering for An 18% Grey World.

It is important to remember that light and shadow create mood. "Shadow creates drama" is a common expression among photographs, but it is only half true. If you meter for an 18% grey world and don't have much shadow then your picture, while it may be pretty, probably won't be very interesting. On the other hand if you deliberately over expose your beach photos by one stop, open the aperture to f11, then you can convey the kind of blinding light one frequently experiences at the beach. Or on the other hand you can underexpose a bright sunny day and then introduce light to your subject with the use of flash to add dram to an image, a common technique used in fashion photography today. 

Scott Robert Lim's Flash Calculator
Scott Robert Lim produced a guide for speed lights which will let you know how much flash to add for different lighting settings based on The Sunny 16 Rule, apart from mixing flash with existing sunlight it can function as a guide for you to use on your speed lights in studio as well. Understanding light in this way will allow you to open up your photography, giving you greater flexibility to use shutter to control motion, aperture to control depth of field, and ISO to control noise and still increase the kind of impact your images can create by controlling exactly where and how light registers in your image. In this manor you can use both shadow and specularity to add drama to your images.


Follow Us


Sunday, June 23, 2013

Lighting Your Subject - Moving the Flash Off Camera, Part II


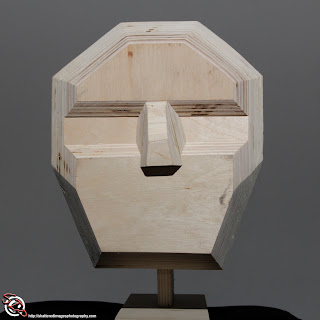
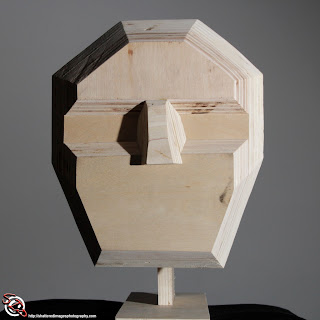
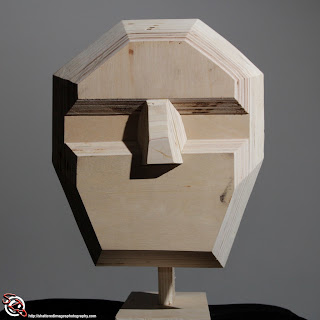
This is a continuation from last weeks blog, in this installment we are going to look at how light direction effects your image. For this series of images I was shooting with the Canon EOS 60D camera with the 28-135mm f3.5-5.6 USM Lens set 44mm, the aperture was set to f8, the ISO to 800, and the shutter was set at 1/250th. The camera was placed on a tripod and located 3' in front of the subject. The subject was 6' from a white wall which served as the background. The flash I was using was the Canon Speedlite 430EX-II on manual set to 24mm and 1/64th power. The flash had no modifier, and was located 3' from the subject. These setting for both the camera and flash were constant for all six exposures, the only element that changes is the direction the light is falling on the subject. Sitting in for the subject for these images was "The Face" a plywood cutout I hacked together, though a clay mask or mannequin would also make a great subject. These objects are a better stand in when you first start experimenting because they do not move, ergo the only differences will be caused by the placement of the light.

Flat Lighting
Flat Lighting


This first image was taken with the flash mounted directly on the camera. As I mentioned in An Introduction to Lighting Your Subject, this is considered the worst way to use flash. Lighting in this manor is very flat and has the effect of making a person look heavier. This is just one of many factors that contribute to the belief that "the camera adds 10lbs". In actuality it is a combination of several common mistakes that cause this illusion. 


Butterfly Lighting
Butterfly Lighting


This second image is an example of "butterfly lighting", which gets its name from the small butterfly shaped shadow cast by the nose of the subject. This style of lighting is frequently done with a beauty dish and can be very flattering, particularly for young attractive women. This lighting style draws attention to the eyes and face, while emphasizing the cheekbones and jaw line. Unfortunately "The Face" lacks proper definition to truly display these attributes. The light was raised 2' above the camera and moved forward slightly to maintain the 3' distance to the subject.


45 Degrees Camera Right


This third image was created by moving the flash 45 degrees to camera right, in this image the flash was on the same plain as it would be when mounted to the camera. As a general rule portraits are not shot with the light positioned here as the shadow cast by the nose tends to make the nose look wider.


Loop Lighting
Loop Lighting


This fourth images is an example of "Loop Lighting", the name is derived from the loop shaped shadow cast by the nose. This style of lighting is very common in portraiture, it tends to be the most flattering for the widest audience, particularly if you use softer light and add some fill both of which will help to even skin tone, hide blemishes and reduce the appearance of wrinkles. It is also closely related to Rembrandt Lighting which I will cover In depth in a later blog entry.
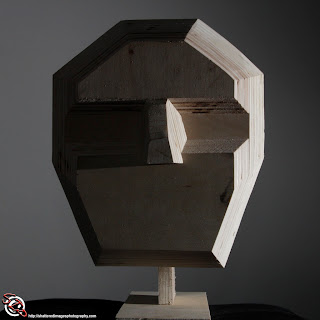


Split Light 90 degrees camera right


Split Light 90 degrees camera right up 30

These last two images are examples of Split Lighting. In this style of lighting the light comes in to the subject from 90 degrees, effectively splitting the face into a lit side and a shadow side. 


It is important to note that for most of the lighting styles mentioned here the direction the light falls on the subject is much more important then the placement of the light relative to the camera. For instance, if you are stuck with a point and shoot camera and you have to use on camera flash, having your subject turn their head thirty degrees to the side and tilting their head towards the camera will use the on camera flash as Loop Lighting. This will add some definition to the shape of the face, with a little practice you can help your subject further by twisting their shoulders slightly so you can elongate the neck to eliminate excess chins. In this manor a photographer can make up for some of the limitations of having to use on camera flash. 

At this point some of you are probably wondering why I have written three blog entries on lighting but I have yet to talk about "proper exposure". In general proper exposure is considered to be exposure for the mid-tones, however if you are shooting low key photography most of your image will be very dark to black and little of the mid-tones will actually be exposed. Also, above I made general statements about when certain lighting styles tend to be used, but I have not referred to any of them as "proper" (with the exception of mentioning trying to avoid Flat Lighting), nor did I make that kind of judgment in the previous article on hardness. In all of these cases what is "proper" depends entirely on your vision as an artist, including the use of Flat Lighting. In all of these cases you should make it a conscious decision to use a specific style quality and intensity of light. 

I will say though, having sufficient contrast is important, that is the range from light to dark. What is a frequent mistake in photography, particularly in interior ambient light, will be the presumption that no flash is better then on camera flash. A person will opt to turn the flash off because there is enough light to shoot without it. But this is usually the case in buildings with lots of strip lighting. Everything is lit very uniformly and the dynamic range for the entire exposure may only be about half a stop. This lighting is ok for our day to day existence since we are seeing that environment with two eyes, but seen through the lens of a camera the image will end up being very muddy. Turning on your flash, using it at low power and letting it be a little bit of a kicker for an ambient exposure can do a lot to combat what would otherwise be a waste of a shutter release even though it is "properly exposed". Adding flash will add contrast which will ad pop to what would otherwise be a blah image.  

This should give you a couple of more tools to add to your photography trick bag. Good photography can be daunting, but if you break it down into digestible pieces you can really start to get a good handle on what you are shooting.


Follow Us


Sunday, June 16, 2013

Lighting your Subject - Moving the Flash Off Camera

I have frequently mentioned the importance of using light to control light and by extension to control exposure so that you can then use Aperture, Shutter and ISO more creatively. But to control light with light you first need to understand light and what element it adds to photography. For this post I am going to look at a particular aspect of light, hardness, and its contrasting aspect, softness. All of these photos were taken with the EOS 6D mounted on a tripod 4 feet from the subject. The ISO was set to 1600, the shutter to 1/160th, and the aperture to f16 and the lens was at 105mm for all of the images. The main light, or Key Light if you will, was a Canon Speedlite 580 EX-II set to 35mm placed 45 degrees to the subject on camera right and triggered by a Canon Speedlite 600 EX-RT. My subject was 8 feet from the white wall that served as a background. All of the above setting were locked for all of the photos. The light quality was changed with modifiers and distance of the light to the subject. The power output of the light was adjusted as well to maintain proper exposure for the midtones.

Let me just take a moment and go into hardness or softness of light before we continue on to the photos. What is Hard Light? The short answer is that hard light creates a hard edge to the shadows and soft light creates a gradient transition from light to shadow. If you have not looked at An Introduction to Lighting your Subject go ahead and take a moment and look that post over. The second and third images from that post show nicely the difference between hard light and soft light. For the photos below I sat in as a subject so that these differences could be easily observed on the human form.

Ok now we have an idea of what hardness means, how do we control it? The simplest way to think of it is that hard light is a small light source and soft light is a big light source. However the size of the light is not the only thing that effects hardness. Hard light is very uniformly directional. This is a by product of the size of the light but also the distance of the light and what type of modifier the light has in front of it. Perhaps the easiest way to picture this is to think of sunlight on a clear day. The Sun is huge which should create soft light - but it is very very very far away which makes it very very very small in appearance which is what makes sunlight so hard. On the other hand if you go out on an overcast day the whole sky functions as a soft box and shadows can almost completely disappear. What follows are a series of 4 images with a brief description on set-up.

This first image has the hardest light quality, the 580 EX-II Speedlite was mounted in an Interfit Strobies S Bracket with a 7” reflector and a honeycomb and was placed at 9 feet from the subject. The reflector and honeycomb make the flash effectively a 7” light source. The second image has the same modifier but is moved to 3 feet from the subject. It is possible to see a slight softening of the light between the two images, however the light quality still remains quite hard, this is because at 7” the light source is still smaller then the subject even at the closest distance. Another way to picture soft light verses hard light is, soft light is from a source that is bigger then your subject, hard light is from a source that is smaller than your subject.


Light 9' Reflector w/ Honeycomb
Light 3' Reflector w/ Honeycomb


For comparison the soft light from both the 3’ and 9’ distances is using a 36” square soft box. This is a much larger light than the reflector and honeycomb and the softening effect of the larger light is much more evident. In the interest of going from hardest to softest the 3rd images is of the soft box and 9’ and the 4th is with the soft box at 3’. The closeness of the light in the last shot makes it the largest light source in the series.

Light 9' w/ 36" Soft Box
Light 3" w/ 36" Soft Box
This is a brief look at lighting your subject with an off camera key light. A couple of things to point out. The first is that in the interest of changing as few elements as possible the hight of the light was not changed, only the distance to the subject. If you compare the 3’ images to the 9’ images it is easy to see that the hight of the light was much more appropriate for the images at 3’. As you start to experiment with light you will want to light your subject from a higher angle then they are. When you move your light further away the light will need to be raised in order to maintain that angle. Generally light from somewhat above is more flattering. The second thing to notice is that in both of the 9’ images the key light is starting to light the background. It is much more pronounced with  the 36” soft box because the light from that modifier is much less directional, it spills around the room and much more of the light lands on the background. As the light is moved from the subject the ratio between the subject and the light and the background and the light decreases meaning that enough light is starting to fall on the background for the background to expose in the image. I deliberately set up in front of a distracting background so that the use of a closer light source, not only to create softer light but to control light spill in other areas of the frame could be observed. One easy way to get rid of background distractions is to not light them. This is why ISO is not an effective way to control light.

At any rate this should give people a starting point for experimenting with light. Light can seem overwhelming when you first move from natural light and being locked into The “Big 3” and move into modified light. But if you break lighting into small easily understood pieces then you can start to build a skill set which will serve not only with flash, but will allow you to modify ambient and natural light as well.


Follow Us


Sunday, June 9, 2013

Learning to Shoot Without Photoshop

I see a common occurrence in emerging photographers, it goes like this. A person enters into photography, usually they start with an inexpensive camera. They discover it is a hobby they really enjoy. Their passion moves it from hobby to obsession. At this point they invest in their hobby, better camera, maybe some lights, and Photoshop. This all seems like a normal progression, and the end result, with time, is an improved end product.

So now you are asking what's wrong with this picture? The step that gets missed is an investment of time, time spent learning fundamentals of good photography. So while the end product may be improved, the photography itself is not. The real reason this is a problem is that photo editing is a destructive process. I will get into that more below, but first I want to point something else out.

What started as a fun hobby with most of a persons time spent taking pictures turns into hours spent at a computer correcting pictures to match the vision in the artists head. The artist sits there going, everything looks muddy, lets correct contrast in curves. The colors aren't quite right, let me adjust color temperature, aw-oh I need to shift tint too. I really wish the light had highlighted this better and fallen off to shadows, let me dodge and burn everything. This area is in to sharp of focus let me add Gaussian Blur, this other area should be in focus, let's see how well we can fool the eye by adding an unsharp mask and increasing edge contrast... All of these are important skills to have, but a person should not be spending their time performing emergency surgery on their photos. Rather they should spend that time shooting and creating great art.

In short the investment in time that gets made is not one of learning photography, but rather one of learning photoshop. This is an important skill set to have, but as I mentioned above, all of these manipulations are destructive. That is you go from having a lot of data for you photo to not having very much. This limits the amount of post manipulation you can do. Photography is always limited by technology, don't start it off with a handicap.


Follow Us


Sunday, June 2, 2013

An Introduction to Lighting Your Subject

This is a very basic introduction to lighting for photography. For this tutorial I was shooting with a Canon EOS 60D with a Canon 600EX-RT Speedlite in the hot shoe of the camera. The camera was set to Aperture f8, Shutter 1/250th, ISO 800, the lens was set to 135mm, and the flash in Manual Mode for all three photos. I am starting lighting at this point because I believe it will apply to the largest segment of the reading audience. It is also important to note that while I was shooting with a DSLR it is very practical to experiment with this style of lighting using a point and shoot camera and an external flash that can be triggered by the on camera flash. Bower makes external flashes that can operate in this manor for well under $100.00. You could also substitute a lamp for your light source. For more information on lighting with Speedlites I highly recommend checking out Syl Arena and Scoot Robert Lim. Ok on to the tutorial.

Flat Light
Flat Light
The first photo in this series is shot with on camera flash pointed straight at the subject,  set to 1/64th power and set to 28mm. This is a lighting style that makes most photographers cringe, but it is also what many people are commonly stuck with if they only have a point and shoot camera. This is what we refer to as flat lighting, it tends to be very unflattering. I shot this image to show a couple of different things. The first is that, while this subject is interesting enough to look ok in flat light it is a reference for the later two images. It is also a very good example of the Inverse-Square Law. That is, it shows how light intensity falls off with distance. The subject in this photos is cream colored while the wall behind it is painted true white. The light (and camera) are 3 feet from the subject and the wall is an additional 5 feet beyond that. Because of the distance to the wall being much greater then the distance to the subject the wall is underexposed making it appear much darker. This can be a good technique for bringing focus to your subject by making it the lightest object.

Bounce LIght Hard
Bounce Light Hard
For the second image in this series the camera is again placed 3 feet from the subject but the light is now being bounced off of a white wall 6 feet to camera right. The flash is set to 1/8 power and 28mm. The power increase was needed because the distance the light is traveling to the subject is now 12 feet, 6 to the wall and 6 back to the subject. When you hear the term bounce flash, this techniques is what the person is referring too, an on camera flash being bounced off of a wall, ceiling or other reflector to change the angle of light falling on the subject. It is also occasionally done with off camera units to make the light source bigger, a little more on that below. In this image the light on the subject is coming from the right and it does a much better job of showing depth and texture in the image. If you think back to basic art classes, when you want to draw a ball you start with a circle and then add shading to give the illusion of depth. A photo is a two dimensional representation of a three dimensional object. Comparing the 2nd image to the 1st it is easy to see the difference in apparent depth of the two images, they are both flat but the second image shows much more depth. This exercise is commonly done with an egg for beginning photographers, it can easily be demonstrated with an egg or ball and a flashlight. This is a great way to begin exploring how light direction effects our perception.

Bounce Light Soft
Bounce Light Soft
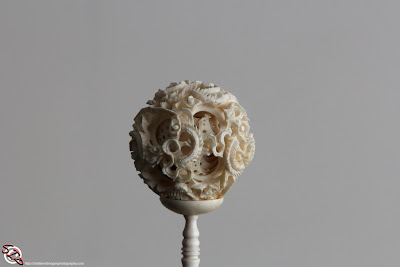
The last image in the series was shot the same as the second, the exception is that the flash while it was still set to 1/8 power was now set at 14mm, this gives a bigger pool of light on the wall. This creates a larger light source and is referred to as softer light. If you compare the 2nd image to the 3rd you can see the edges of the shadows are a little more defined in the second image while the light in the 3rd wraps into the shadows on the back of the ivory ball. As I mentioned above occasionally off camera flash will be bounced off of a wall to create a much bigger and thus much softer light then can be done with on light modifiers. This is something I will cover in much greater detail in later lighting tutorials. The last point to be made from this series gets back to the Rule of Squares. The background is much lighter in the second two images because it is much closer to the light source in relation to the subject then it is in the first image. In the first image it was 8 feet from light to the wall, an additional 5 feet beyond the subject and almost double the 3 feet it was from the light to the subject. In the second and third images it is 12 feet from the light to the subject and only about 16 feet from light to the wall at the right edge of the second two images. In these images the light fall off can also be observed on the wall in the background. the light on the left hand edge of the image is a little darker giving the wall a slight gradient.

This is a basic intro to lighting. I would suggest getting an egg, a ball or a friend to sit in for you and run through it. Obviously it can be done in about 5 minutes, but if you really take your time, you can learn a lot from this simple exercise. It is a great way to learn about both light fall off and light direction and the options for shooting like this are limitless. You can very light direction and light source to get a much greater  understanding of how light effects your images. Once you master lighting your subject it is easy to add other lighting elements.


Follow Us