 |
| Flat Light |
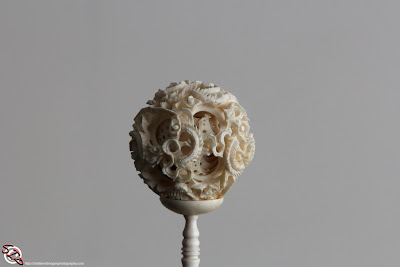
The first photo in this series is shot with on camera flash pointed straight at the subject, set to 1/64th power and set to 28mm. This is a lighting style that makes most photographers cringe, but it is also what many people are commonly stuck with if they only have a point and shoot camera. This is what we refer to as flat lighting, it tends to be very unflattering. I shot this image to show a couple of different things. The first is that, while this subject is interesting enough to look ok in flat light it is a reference for the later two images. It is also a very good example of the Inverse-Square Law. That is, it shows how light intensity falls off with distance. The subject in this photos is cream colored while the wall behind it is painted true white. The light (and camera) are 3 feet from the subject and the wall is an additional 5 feet beyond that. Because of the distance to the wall being much greater then the distance to the subject the wall is underexposed making it appear much darker. This can be a good technique for bringing focus to your subject by making it the lightest object.
 |
| Bounce Light Hard |
For the second image in this series the camera is again placed 3 feet from the subject but the light is now being bounced off of a white wall 6 feet to camera right. The flash is set to 1/8 power and 28mm. The power increase was needed because the distance the light is traveling to the subject is now 12 feet, 6 to the wall and 6 back to the subject. When you hear the term bounce flash, this techniques is what the person is referring too, an on camera flash being bounced off of a wall, ceiling or other reflector to change the angle of light falling on the subject. It is also occasionally done with off camera units to make the light source bigger, a little more on that below. In this image the light on the subject is coming from the right and it does a much better job of showing depth and texture in the image. If you think back to basic art classes, when you want to draw a ball you start with a circle and then add shading to give the illusion of depth. A photo is a two dimensional representation of a three dimensional object. Comparing the 2nd image to the 1st it is easy to see the difference in apparent depth of the two images, they are both flat but the second image shows much more depth. This exercise is commonly done with an egg for beginning photographers, it can easily be demonstrated with an egg or ball and a flashlight. This is a great way to begin exploring how light direction effects our perception.
 |
| Bounce Light Soft |
This is a basic intro to lighting. I would suggest getting an egg, a ball or a friend to sit in for you and run through it. Obviously it can be done in about 5 minutes, but if you really take your time, you can learn a lot from this simple exercise. It is a great way to learn about both light fall off and light direction and the options for shooting like this are limitless. You can very light direction and light source to get a much greater understanding of how light effects your images. Once you master lighting your subject it is easy to add other lighting elements.

Follow Us
No comments:
Post a Comment