Sunday, January 27, 2013

Canon 7D - Equipment Review


Canon EOS 7D
Canon EOS 7D
A powerful workhorse bringing function and control to your fingertips. The Canon 7D was designed to offer the professional shooters a wide range of shooting options in one complete package. Utilizing Canon's 1.6 APS-C sensor the 7D stands well above Canon's X0D series cameras. Offering photographers wireless flash control, video, incredible burst frame rates, numerous auto focus points, and custom settings it makes adapting quickly to changing shooting conditions a breeze.

The Canon 7D brought the introduction of Canon Speedlite control to the back of the camera. While the ability existed to use Canon Speedlites with earlier models their use was somewhat hampered by the need to set each group manually at the lights or to control them from a 580 EX series or other wireless control for Manuel and ETTL. With the 7D all of the Speedlite groups can be controlled directly from the camera body and fired with the built in flash in both manual and ETTL modes. 

The 7D also brought 1080p video to the DSLR market (it was also introduced to the Canon Rebel line at this time). This was a big 1st step in introducing video to professional DSLRs, but really it still suffers from two big drawbacks. The first is the loss of the auto focusing function while filming maketing tracking moving subjects somewhat challenging. The second is the FAT32 limitations restricting higher resolution video to 4 minute clips.

The 7D is capable of 7-9 frames per second in burst mode and is able to sustain that rate of fire for 126 frames. I am not aware of any other camera firing as fast, giving the 7D an unrivaled ability to capture action in a way never experienced before and allowing the creation of still-motion video by stitching the frames together in video editing software. The biggest draw back to this feature is the ability to effectively light the subject, these fast frame rates require near daylight conditions, limiting you to shooting outdoors or requiring bright continuous studio lighting such as that used for video.

19 auto focus points make it a breeze to get your focal plane spot on to your subject. This is a very helpful option to have when working with a very shallow depth of field. This feature is enhanced with focal point memory, that is the camera remembers the most recent focal point used for each orientation, landscape and portrait, of the camera body.  Combine this with the quick selection hat switch and it makes this camera very quick to focus.

The 7D also has a wide range of programmable modes. Custom shooting modes allow you to save your 3 most common shooting settings to the camera dial, the custom menu allows you to locate your most commonly used menu functions on one screen and if that is not enough the cameras external buttons can be programmed to preform different functions, allowing you to set the buttons to the layout you prefer.

A couple of things I was not so fond of - the use of Compact Flash, it is not a bad format, but is much less convenient then SD. Color modes, not an adjustment to color temperature, but shooting modes that are black and white, sepia, black and white but with a green tint. These are the sorts of features that are added to point and shoot cameras to give beginners a wider set of options without the use of separate software on the computer. I have yet to run into someone who shoots with DSLRs and does not have at least moderately good post editing software, all of which gives much greater control over adjustments to black and white or sepia - or whatever other color scheme the photographer may wish for.

All in all I find the 7D to be a very powerful camera offering a lot of flexibility at your fingertips. Despite a couple of minor inconveniences I find the 7D to be the most adaptable of my cameras and for this reason it is still my favorite camera body to shoot with.


Follow Us

FaceBook
https://www.facebook.com/pages/Shattered-Images-Photography/274273146947

Twitter
http://twitter.com/Shatteredimages

Website
http://shatteredimagesphotography.com/index.html
Sunday, January 20, 2013

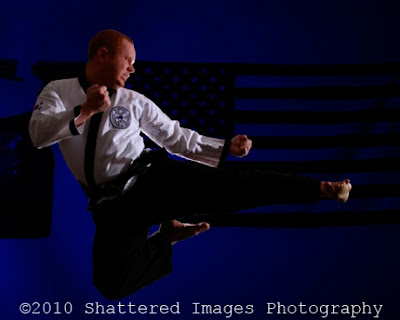
Photographing Martial Arts


Photographer Brendan Beavers - Shattered Images Photography
Martial arts has been a favorite subject of mine for over 25 years now. Long before I was doing photography professionally I was a student of the martial arts. One of the things that was always disappointing was how poorly the pictures of martial arts generally turned out. Occasionally there would be a good picture, but it was a fluke and not reproducible. A few different things were at play to cause this. First and foremost was our poor understanding of photography, particularly how the auto settings 18% grey valuation effects the big three. Secondly was equipment, not so much on the camera side but on the lighting side, lights have come a long way and gotten much cheaper. And third is having a good understanding of how pictures render martial arts, what poses work if you will.

Lets look at these factors from a photo journalism, or journalistic portraiture style. Journalistic portraiture is telling a story with a portrait, so if you think of a conventional portrait of a martial artist as a three quarter bust sitting there in their uniform then a journalistic portrait would be one of them breaking a board or landing a kick. As I believe that this is the style that most of the readers of this blog will be interested in it is what I will discuss here. Later styles will be covered in future articles.

The first thing that hampers a good martial arts photo is how the camera is set up, how it expects to shoot the world. See An 18% Grey World. These expectations drive the auto settings. The camera will favor a shutter between 1/60th and about 1/120th of a second depending on available light. Using your cameras preset sports settings will tell the camera to favor higher shutter speeds, hopefully there will be enough light for well above 1/250th of a second so you can capture the action with out having lots of blur. If you are comfortable with the manual settings on the camera using the shutter priority setting to force the camera to shoot at 1/250th is a good option. This way the camera will adjust ISO and aperture to maintain exposure with out sacrificing shutter speed. I would also suggest setting the camera meter to spot meter on your focal point which will be your subject so the camera does not use the background to determine exposure.

With the advent of lightweight powerful portable lights the high shutter speeds necessary to freeze martial arts action is even easier to achieve. Speed Lights do a phenomenal job and can be mounted on the camera or mounted and fired from a secondary location closer to the action. These lights can be used in a couple of different ways. The first is to use the short intense light of the flash to control the exposure. This can give you an effective shutter speed of 1/1000th of a second freezing a spilt second of the action. The second is to use the light to bump up the exposure, this is a more common use of flash in most people's experience. An image that is to dark can be brightened by adding light, this gives you the option of using the shutter speed creatively to show action and is particularly powerful with the use of second curtain flash. Another option exists but only applies to lights with high speed sync capabilities. High speed sync allows you to still use ambient light in the exposure while using the added light from the flash to use the actual shutter speed for the action. In this manor you can more easily balance the background light with the exposure of the subject if you choose, and it also allows you to be very specific in what shutter speed you use. If you just use the flash to control exposure (that is the camera settings will not expose an image with out the added flash) the effective shutter speed freezes the action, in the second method you can start to add motion blur and use the flash to freeze a part of the action in the frame, either as the action starts (first curtain) or as it ends (second curtain setting). With High Speed Sync you really have the best of both option. You can use very fast shutter speed to freeze the action or you can very specifically control how much you drag the shutter giving you absolute control over how much blur you introduce.

Briefly the last point I mentioned was "posing". Posing is not really the right word when you are shooting action, but many aspects of martial arts do not photograph well because the reference is lost in the image and it is nonsensical to the viewer. This is particularly true of spin kicks. Some things do photograph very well though and with a little anticipation and a spot of timing you can get great pictures of front kicks, side kicks, round kicks, and great photos of different stances. With a little bit of experience shooting martial arts you can learn to catch the action that photos can easily relay.

Photographing Martial Arts Part II


Follow Us

FaceBook
https://www.facebook.com/pages/Shattered-Images-Photography/274273146947

Twitter
http://twitter.com/Shatteredimages

Website
http://shatteredimagesphotography.com/ma_index.html

Sunday, January 13, 2013

An 18% Grey World


18% Grey Card
18% Grey Card
Or why auto settings kill your photography.

Camera technology has come a long way over the decades, shutter speeds have gotten faster and more precise, films more sensitive, the advent of digital and so on. One aspect really has not changed much in the past fifty years - and it's a big one, that is the expectation of 18% grey. As smart as cameras have become there are two very important things that they are missing, an understanding of what your subject is, and more importantly how you want to portray your subject.

So what is 18% grey, where did it come from, and why does it matter. If you take a sample of 10,000 8x10s from ten thousand photographers (proffesional, hobbyist, neophyte, or otherwise) randomly select one square inch out of each photo and blend it all together you will get an average that is 18% grey. That average is why light meters whether in the camera or separate are calibrated to 18% grey. That expectation is what your camera uses to determine exposure, color temperature, and tint. Occasionally 18% grey is rightish, most of the time it is wrong.

Lets start with an example of where that expectation is rightish, landscapes. Landscapes are lit by a giant light source, the sun. Because of this they tend to be lit very evenly, making exposure throughout the frame more consistent, though in many cases the sky will be too bright compared to the land, hampering your camera's grey interpretation. Another issue, for example, your subject may be very green (trees, grass and such) effecting your cameras interpretation of tint, or very yellow like sand confusing the cameras color temperature. So while most all cameras do an ok job with landscapes, you have probably taken pictures of breathtaking scenes only to be disappointed with what the camera rendered. This can be particularly true with sunsets, the world on average is not as red as it is at sunset, so the camera will shift the tint towards green, and the world is not that yellow, so the camera will shift the color temperature towards the blues. It will also likely bleach out the color of the sky trying to properly expose the land, or may leave the land crushed by shadow as it exposes for the sky.

Because of these kinds of limitations camera manufacturers have started adding a broader range of auto functions to the camera, they may call them "scenes" or "styles". These give the camera a closer idea of what lays beyond the lens. So for a sunset you can set the camera settings to "sunset". This gets the rightish interpretation of 18% grey closer, but a sunset over a snow scape is still considerably different from one over rainforest, or one over the dessert.

So lets look at something that grey expectation gets very wrong, wedding photos. Particularly photos of brides in front of white backgrounds (high key) or tuxedos in front of dark backgrounds (low key). In both cases theses subjects fall outside of 18% grey (mid tones) the camera expects. Brides in front of white will come out dingy as the camera underexposes the image to push a very bright subject into an 18% grey world. It also does this to snowscapes and other high key subjects. The opposite happens to tuxedos, the camera overexposes them, again forcing them towards 18% grey. 

Once you understand what the camera is getting wrong you can then start to adjust your settings to get the images you want. If we go back to the example of the bride in front of a white wall and understand that what the camera is doing is under exposing that image, you can then correct it by upping the exposure. Or if your camera has a snowscape setting you should understand that you can us that as an approximation for any high key (mostly white) subject. You may find the snowscape setting better for white sand beaches then the beach setting which is expecting yellows and browns to make up the sand, likewise the beach setting is likely to fail on volcanic beaches where the sand is black.

Another area the cameras auto setting fails is action. This is an easier correction as the  "sports" setting will favor a fast shutter allowing you to freeze action. In general when the camera gets its meter reading it will set a shutter speed close to 1/60th of a second. This is the slowest shutter you can reasonably expect to hand hold the camera. It will actually be much higher, perhaps 1/120th if you are zoomed in on something. The camera will favor slower shutter speeds so it can close the aperture as far as possible to still get proper exposure while giving you the deepest depth of field on the lower ISO settings. The logic being if you can hand hold the camera with a low ISO and large depth of field it will give you properly exposed photos for the widest range of subjects while limiting noise (and creativity). I will discuss how shutter speed and aperture effect photos in much greater detail later, but it is important to understand how the 18% grey expectation effects the camera's prioritization of these settings. 

Looking at all of the things effected by the 18% expectation of the camera may seem quite daunting, it reaches into everything the camera does, understand that. But then break it into digestible pieces. Start with the ones that have the greatest effect on your photography and work out from there. Having this understanding of where the cameras expectations come from will let you correct for what you subject is and will immediately improve your shooting.

Follow Us

FaceBook

Twitter

Website

Sunday, January 6, 2013

Getting the Most Out of Your New Camera


Panasonic DCM ZS10 & Canon EOS 6D
Now that the excitement of the holidays are over many of you are sitting there with a shiny new camera eager to get out and start taking fantastic pictures. Whether it was a gift or a treat you got for yourself; a shiny new DSLR or a compact point and shoot, here are a few things to keep in mind to help you get the most out of your new camera.

  1. This should go without saying, but read the instruction book. I have been shooting for years and I still read the book. If you have a high end camera a publisher named Wiley puts out a Digital Field Guide specific to the DSLRS model. These books are indispensable, not only do they go into much greater depth of instruction then the tech manual, they also tell you how to you those setting to their best effect. A how to guide if you will.
  2. Avoid shooting in RAW. A lot of people will give the exact opposite advice, but RAW really only gives you an advantage in some situations. If you have the habit of shooting in RAW you don't have any real impetus to learn things like color balance and proper lighting. RAW quickly becomes a crutch and your photoshop will improve, not your photography.
  3. Shoot often, a few pictures everyday if possible. Nothing will build familiarity with your new camera faster then constant use. Lets say you average 300 photos a month, it is much better to do this split up as ten photos a day then it is to shoot all 300 on the first of the month. This is for a couple of reasons. First, if you have 29 days you are not shooting that is 29 days to forget what you have learned. Secondly if you shoot all at once odds are all 300 images will be shoot in the same setting. You will have spent 300 frames learning what you could explore in ten and then revisit later in the month once you have gained a broader understanding. 
  4. Shoot a variety of subjects. You are going to have a favorite subject, say modern portraiture, shoot that about 1/3rd of the time. The rest of the time shoot a variety of other things. What you learn shooting landscapes will translate into better portraits out doors. What you learn shooting still life's will translate into a better understand ing of how to position your subject in relationship to your light source and back ground as well as teaching you what focal lengthens will create the best perspective for the image you want to create.
  5. Remember the camera ALWAYS lies. A few different things are at play here. The basics are focal length, color temperature, and dynamic range. The camera will always interpret the scene in front of it through these filters and create a scene based on that interpretation. If you want a reportage style shot then you need to shoot close to an 80mm focal length, be sure the white balance is properly set, and that you have enough light to light the shadows without bowing out the highlights to get something close to what your eye sees. Or you can create something surreal by shooting in a different color temperature, over exposing and blowing out the highlights, and flattening everything with a long lens. The important thing to remember is the camera lies, which lets you have the power to create the images you want, these do not have to be what the eye sees.

Thursday, January 3, 2013

Handheld Light Meters


People occasionally ask me about handheld light meters. Let me preface this by saying, I do not use a separate light meter and I find them to be a waste of time and money for digital photography. Having said that, some photographers really like them, even for digital.

The handheld light meter is a bit of tech from the days of film when you could not immediately see the result and histogram of your image on the back of the camera, or in the computer if you are shooting tethered. A good light meter will be able to measure a few different things, ambient light, incidental light and reflected light, as well as telling you these measurements for a single light source or the combination of multiple light sources including strobes. Before digital this was very important for being able to get an accurate idea of what the separate lights were doing. In the days of film this was very important since it might be a couple of weeks before you would see the effort of your labors - to much time and expense later to have to correct a lighting mistake. Handheld meters did something the primitive built in camera meters of the day could not do.

When using a hand held meter you take several readings as you are setting up, one for each light source at least. The short version if you are using strobes as your primary light source is to set the meter to your ISO and aperture settings on the camera and the meter will tell you the power to set your strobes. (Shutter speed in this case being used to control the amount of exposer from ambient light sources.) However the handheld meters will only be accurate to within about 1/2 a stop. A few things will prevent it from giving you the exact exposure you need. The clarity and type of lens you are shooting with for example will effect how the light falls on the camera sensor, this is just one of many things a handheld meter will not measure for.

How is this different from what you would do if you set up without a handheld meter? Its not really. The old built in meters on cameras like my mother's Fuji Rangefinder were very primitive and basically could tell you - there is this much ambient light coming from this direction. The meters built in to cameras now can get very specific spot and even point readings of that light now, which will tell you how many stops of light you need to add or subtract from the image as it would expose with ambient light on a specific point in the frame. This lets you be very specific with what you want to expose for in the frame, somebodies cheek for instance. You can then also check to see how the window next to them will expose just by shifting the point you are measuring (most cameras measure the same point they use to focus.) As you are setting up and turning on your lights you can take test shots and compare the image and histogram to what you expect based on your meter readings and light settings and adjust as needed, basically combining the metering for the lights with your test shots and saving a little bit of time in set up, eliminating the need to then adjust for errors. And more importantly saving you the expense of a separate tool and the batteries to run it.

The most important thing in photography is what light is getting to the sensor or film. The built in camera meters have come a long way in the kind of readings they give you. This combined with the instant image on the screen and the histogram telling you the complete dynamic range of the image I personally have found handheld meters to be an unnecessary step. In most cases I can have the lights set for the exposure I want in two to three test shots. This is something a handheld meter wont tell you, it will give you a reading based on an 18% grey world and guess on how you intend for the light to interact with your photo, meaning that after you take the time to meter, you will still probably need 2 or 3 test shots to fine tune your lighting.


Follow Us

FaceBook

Twitter

Website