Sunday, March 31, 2013

Sponsoring a Successful Pet Photo Shoot

Pet Photography
Pet Photography

Pets are an important part of the family. As such, it is important to get quality images of these treasured family members. Here are a few pointers to consider if you are planning on hosting a photographer at your business.

It is important to find a photographer with good people skills. After all, that photographer is not only representing their own business, but yours as well. A photographer who is polite and prompt with a fast turnaround time will make a good impression on your clients. If you open the event to the public at large, the photographer will help draw more business to your venue by making a positive lasting impression on all who attend. This should be a positive experience for you, your clients, and the photographer.

It is also important to have a photographer who is comfortable around animals. For many animals the groomers and vet office are stressful places. When you add new people and unfamiliar equipment that has picked up numerous other scents, all of these stimuli can easily overwhelm the animals. Having a photographer who is uncomfortable around animals will only add to the animals stress level. Suggest to your clients to bring the animals favorite toy, blanket, foot stool, or other object from around the house to use as a prop in the photos. Familiar items can go a long way to helping the animal feel more secure.

Be excited about the up coming shoot. Put the promotional material up where your clients can see it, announce it frequently, put it in the newsletter, send out email announcements, promote the Facebook event. If the photographer does not make a Facebook event make one yourself. If you are excited about the up-coming shoot, your clients will be too.

Pet Photography
Pet Photography
Try to keep the clients grouped together. Nothing can make a shoot drag on like only having 1-2 clients an hour. A good photographer will have great time management skills and will easily be able to help 6-8 clients an hour get great photos of their beloved pets. It is also important to have one or two staff members available during the shoot to help with the animals. As I mentioned above it will already be a stressful situation for the animals. Familiar people that know the animals and their personalities will go a long way to helping the animals be more comfortable.

A pet photo shoot can give your business exposure to new clients, create a lasting impression with current clients, and leave you with many wonderful photos to showcase the work you do. If you keep these few simple things in mind, hosting a pet photo shoot at your location can go a long way towards helping your business grow. 


Follow Us

FaceBook

Twitter

Website

Sunday, March 24, 2013

Canon 6D - Equipment Review


Canon EOS 6D
Canon EOS 6D

With the release of the Canon EOS 6D full frame cameras have been brought to a price point near $2000.00 making them accessible to more people. While introduction of the 6D has made full frame more affordable it still brings a wide range of options to the shooter. However it is not really the step-up from the Canon 7D that I was expecting - it is more like a step sideways.

The full frame sensor and the 24-105mm f4 L lens do capture I higher image quality then the 7D with the 18-200mm f3.5-5.6 EF-S, for most people this gain is not going to justify the $600.00 price difference just between the bodies of the two cameras plus a $450.00 differences in the lens cost. The 6D does bring other value to the table, primarily the GPS and Wi-Fi functionality being built into the camera, but again I do not know that this really justifies the cost difference. 

The 6D also supports the new 600 EX-RT flash system which allows you to control up to 5 flash groups from the rear of the camera, but without the pop-up flash control of the 7D it is not really a gain. You either have to invest in a radio trigger or use one of the flash units as a master controller and have it camera mounted (or camera connected via cable). So in this case you are pretty much breaking even, especially if you consider that to take advantage of the D and E flash groups you have to invest in $600.00 flash units since the older flashes do not offer these group options. The only real gain this has over the $250.00 430 EXII is the radio trigger, but that can be a very important feature depending on where you shoot.

The area the 6D is really lacking compared to the 7D is ease of control. It does not have nearly as many options right at your fingertips. The 6D has one less custom setting as well. And to top that all off the autofocus system is a little sluggish compared to the 7D, has less focal points, does not remember which point is used in each orientation (landscape or portrait), and is much more difficult to drive lacking the hat switch the 7D uses for its autofocus. In all of these areas the 6D is really a step behind the 7D.

A couple of further aggravations, the built in GPS and Wi-Fi meant the magnesium allow body was not an option requiring the 6D to be manufactured out of plastic. These features, while very handy, also draw heavily on the battery. And with the requirement of a plastic body the 6D sacrifices some of the weather and shock resistance of the 7D. Another dissapointing fact, the 6D has a much slower burst rate as well. So for my money, if I had to choose between the 6D and the 7D - for most instances I would recommend the 7D, a few people will need the full frame or GPS, Wi-Fi options the 6D offers that the 7D does not, and those are the only cases where I would recommend the 6D over the 7D.


Follow Us

FaceBook

Twitter

Website

Sunday, March 17, 2013

Photographing Martial Arts Part II - Studio Lighting


Basic Lighting for Martial Arts Photography

In an earlier article, Photographing Martial Arts, I discussed some of the things that can effect getting good martial arts photos: in the class, during testings, or at tournaments. In this article I am going to focus on getting good martial arts photos in a photography studio setting.

First lets talk about a few basics which really help photos to stand out. Lighting, is of course one key factor, and in this article we will be dealing a lot with lighting. Composition is another very important thing to consider. As is timing, when you are setting up and shooting action photos such as kicks. I talk about this more in Photographing Breaks.  

Lets take a moment to look at composition. Many people tend to view composition in terms of the subject. It is much more then just the subject though. It can be quite easy to spot photos taken by amateurs simply by looking at the background. Many beginning shooters are so focused on their subject they do not notice what is behind the subject. Photos flatten everything out and it can make it look like that potted plant is growing out of a persons head. Bright patches of light, or unexpected people moving though the background, especially if the person is in bright clothing, will also draw focus away from the subject. It is important to remember that composition is the combination of foreground, subject, background, and flow. Flow is something I will go into in much more depth later when I talk about posing, but remember the direction a person is moving is also going to be an important element to the overall composition.

One of the great things about studio shooting is the ability to have absolute control over the environment. This allows us to remove potential spoilers and stop photo bombs before they happen. This is one of the main reasons for shooting on a backdrop, but carefully selecting a portion of the room with no distracting elements can work just as well. With a little practice you can then move on to include other elements to help tell a complete story, such as a weapons display or trophy case.

Lets look at Lighting - Studio Lighting for Martial Arts Photography


Ok, so lets talk about light. For this article I am going to keep the light fairly simple and approach Martial Arts Photography as if it were a product. This is for a couple of reasons, first it will adapt easily to anything else you are shooting, and second because you wont need to think about what the light is doing as you shift your subject from pose to pose to pose, making learning this skill easier. 

For this discussion I am going to explain it from the perspective of shooting on a backdrop, but it is very adaptable to using a blank section of wall as I mentioned above. I am also going to speak in terms of strobe or studio flash as this gives the sharpest cleanest results but it is also possible to use constant lights or even household lamps provided they are all using the same kind of bulbs, the same color temperature.

For this style of shooting we are going to be using three sources of light: a Key Light, a Fill Light, and a Background Light. It is important to be able to adjust the intensity of these lights independently and to control where the light falls. It is possible to do this by moving the lights closer to or farther away from what they are lighting and using a lamp shade to direct them. However professional lights are certainly the easiest and most adaptable for this purpose, it is what they are designed for.

Lets look at the Background Light first. This is just as it sounds it is the light being used to illuminate the background of the picture. You will want this light to only fall on the background and illuminate it so that it compliments your subject. This will require a little bit of practice but in time it will be quite easy to see what intensity you need. One of the reasons to be sure the light source does not also fall (or spill) on to your subject is the use of color. A splash of complimentary color in the background can really help bring a photo together and help the photo to really pop. In general you will want to illuminate as broad an area as possible as evenly as possible for this style of shooting. This is so it will not matter as much where your subject is in relation to your background, for ease of shooting.

Next lets talk about the Key Light, this is the main light that will be falling on your subject. For a moment, think about most places where you see people, and where the light is usually coming from. Generally this will be outside or in a room with overhead lighting, for this reason we expect the light in a photo to come from a higher vantage then the subject. This is one of several reasons on camera flash tends to generate poorer photos then those using light sources from other locations. The Key Light should be located on a stand that is taller than what you will be shooting and the use of a large reflector is a good idea. The larger the apparent light source the softer and more flattering the light tends to be, this is why photographers use umbrellas. Usually I place the Key light to camera right cutting across the subject and casting the shadows down and away from the backdrop. Shadows falling on the backdrop can be an interesting compositional element, but in most cases they are distracting and it can be quite challenging to use them well.

This brings us to the Fill Light. The Fill Light does just that, it helps to fill in some of the shadows. Again it is a good idea to use a large reflector. The softer (larger) the light source the less pronounced things like blemishes and wrinkles will be, it will also help to cut other shadows, which is the primary purpose of Fill Lighting. In this style of lighting it is usually standard to place the Fill Light at an equal angle on the opposite side of the camera from the Key Light and with a lower vantage so that it reduces the amount of shadowing created by the Key Light. It is important to not completely remove those shadows though. Think back to art class, how do you make a circle look like a ball, add shadows. For this reason the lights will generally have a 4/3 or 3/2 Key Light to Fill Light ratio. There is no specific magic number, just be sure that some shadowing occurs with out lots of detail being lost in the shadow, it just takes some practice.

Studio Lighting - Putting it all together.


Once you have your lights set it is a good idea to have a subject stand where the photos will be taken and then look at each of the lights independently. Start by just turning on the Background Light and seeing how much coverage it has, then switch it off and see how each the Key Light and Fill Light respectively cover the subject. This is the easiest way to see what adjustments need to be made. Once you have looked at how the lights are working independently switch on both the Key and Fill and see how they are working together and then finally add the Background light. This process will give you a very good idea of what each light is adding to your photos. Once you have done this a few times you will have a feel for how the lights work and will only need to occasionally check them independently, this will mainly only be needed as you adapt the lighting to create different moods in your photos.

This is a basic rundown of how to do Studio Lighting for Martial Arts Photography. This is really just the basics. I have heard it said that it takes five years to really begin to see light. Certainly some people learn faster then others, that learning will also be effected by the types of shooting you do. Getting the basics of Studio Lighting down will be a big step in learning to see light. The more you experiment with what the lights do independently the more you will understand lighting in general, which will provide you a tremendous working knowledge of the kind of lighting you will need for any situation.


Follow Us

FaceBook
https://www.facebook.com/pages/Shattered-Images-Photography/274273146947

Twitter
http://twitter.com/ShatteredImages

Website
http://shatteredimagesphotography.com/ma_index.html


YouTube
http://www.youtube.com/user/ShatteredImagesPhoto

Sunday, March 10, 2013

Understanding Histograms


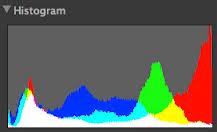
At some point in photography you are going to run into histograms. Though they may seem confusing at first, they actually provide you with a great deal of information about your photo. So what is a histogram? Histograms are used for many things but they are a graphical representation of data. In photography they are one of two representations, either a distribution of lights and darks (a tonal histogram), or the distribution of color (a color histogram).

Tonal Histogram
Tonal Histogram
Lets start with tonal histograms as their use will be the most evident. The left of the tonal histogram is 0, true black and the right is 255 true white. Everything in between is some shade of grey, from 1 almost black to 254 almost white. It is an average of the combination of the additive color wheel, Red Green Blue. So black is the average of 0R, 0G, and 0B and white is the average of 255R, 255G, 255B. 

Now you have an understanding of where the data is coming from what does it actually tell you? Well the tonal histogram gives you a distribution of your exposure. Unless you take a picture of a monochrome setting, as in a test shot of your backdrop your histogram should reach from 0 to 255. If it reaches 70 to 255 then you are overexposed. Likewise If it only reaches 0 to say 225 then you are underexposed, and if it all sits somewhere in the middle like 50 to 200 then you are loosing contrast. The histogram will not provide you with exact numbers but you can get the idea from visualizing their respective approximates on the graphic. 

Keep in mind that is just the total range and not necessarily going to be an even distribution. For example if you take a photo of a bride on a white background very little of the distribution will be down at 0, just the really dark shadows and if her hair is black it will register in the left of the histogram, but the vast majority will be in the right. This is an example of "high key" photography, likewise if you are working in "low key" photography then the histogram will be very heavily weighted to the left but should have some elements on the right, reaching all the way to the 255 edge for the specular highlights or white elements of clothing. 

One last trick you can use for judging exposure is to use the histogram as your light meter. The way to do this is to put a diffuser in front of the camera lens and shoot an image from where the subject would be facing back to where the camera will be when shooting. You can use the diffuser for a soft box for this by turning off autofocus and wrapping the fabric over the lens and holding it in place. This mixes all of the light coming into the camera evenly and will give you a single spike in the histogram. This spike should be In the center, or just slightly left as your diffuser may absorb a half a stop or so of the light coming in. This lets you know your camera settings are set correctly for the light falling on the subject. You can then take a second test shot of just the background and look at the histogram for that. In most photography you will want the background to be shifted to the left as our eyes will focus on the lighter sections of the photo. If the background is to the left of the histogram then the subject will be the lighter section of the photo. High key photography is an exception, here the background should be shifted heavily to the right.

Color Histogram
Color Histogram
The color histogram does the same thing but for each of the three colors, along with showing the areas of overlap and the kind of mixing they have. On many cameras you can actually look at the three colors individually as well. This will give you an idea of the distribution of red, green and blue. If you are taking a landscape photo of a grassy plane with a blue sky then your histogram should be very low in the reds while being quite high in the distribution of greens and blues. As you begin to understand this relationship you will be able to judge color balance and tint in the images you are looking at.

Something to remember, the histogram is a tool not a judge. Understanding it and using it properly should expand your creativity, not limit it. Think of it like "The Pirates Code" from Pirates of the Caribbean it provides a guideline and not hard and fast rules. The machinery does not have artistic vision, you do. Understanding what the histograms are telling you will help you reach your vision, it should not dictate what that vision is.


Follow Us

FaceBook

Twitter

Website

Sunday, March 3, 2013

What's With All the Lenses?


DSLR Lenses
DSLR Lenses

So you have, or are thinking about getting a DSLR. The logical question that arrises is: what lens do I get? or Do I really need a lot of different lenses? Lens choice really is one of the most fundamental things in photography.
Let me explain why. PHOTOS ALWAYS LIE!!!! the lens plays a tremendous roll in how they lie. Why this is important - you have heard the saying "the camera always adds ten pounds" well not really but wide angle lenses make you look fatter, telephoto lenses make you look skinnier, 35mm-80mm (assuming a full frame sensor - or correction for crop factor) sees the world close enough to the human eye that we don't really notice the distortion, under 35mm is considered wide angle. I can make a room look larger in a picture by shooting it with a wide angle lens - I can, and will whether I want to or not, do the same to a person, if I shoot them with a wide angle lens. Wide angles also let you do really interesting things with forced perspective, if you lay a wide angle camera on your chest and shoot towards your feet, in the image your feet will look abnormally small and far away. On the other side of this, fashion models are generally shot between 200-350mm to knock off a size or two or even three with the distortion (compression) of the lens.
So what about f-stop, sure it controls light - but you should control light with the light - let f-stop be reserved for depth of field. For most things you can get a nice shallow depth of field with f4. Both Canon and Nikon have an inexpensive 50mm f1.4 and Tamron makes some nice 2.8 zoom lenses (I have the 28-75mm f2.8, I really like this one for parties) which hold 2.8 across the zoom. Most zoom lenses have a variable aperture that is it will be something like f3.5-5.6 depending where you are in the zoom. Always remember the closer to your subject the shallower the depth of field, use this to your advantage when you need a shallow depth of field. The pattern of the bokah is controlled by the shape of the aperture. If the lens has a really scalloped kind of bokah you can correct it by using a piece of paper and a hole punch effectively putting a round aperture in front of the lens. Or you can make it heart shaped if you want - or even spell words.
So how all of this applies to what you are asking - If you can only get one lens then I would advise something like the 18-200mm zoom (in Canon this comes as a variable f3.5-5.6), which is my goto lens on my Canon EOS 7D, as it will give you the widest set of options - but in general for portraiture I would say over 80mm in a prime and an f-stop of 1.4 if you can get one in your price range (I am not that familiar with Nikon) and zoom with your feet. Once you go over 80mm the lens distortion starts to be more pleasing to how we want the world to view us - skinny! You can do the close ups by moving close to the subject and if the room allows the full body shots by backing up. You can then be very specific on the part of the subject and how much of the subject you want in focus by using the f-stop to control depth of field and how and where you want the light by using your lights (and for this you can start with CFL work lights from the hardware store just get all the bulbs the same temperature and set accordingly on your camera) and light modifiers (most of these you can make yourself).
Note - how you light a subject will also effect how they appear in the photo. Lets say the subject is turned 45 degrees left and the light is shining from that side directly on them (Broad Lighting) it will make them look bigger and is generally used for lighting men. If the light cuts across form the other side of the frame then it is (Narrow Lighting) and makes them look thinner - generally used for women.
Now the advice I give is based on the assumption that you want to do photography where the subject "looks pretty". But say you want something a bit more abstract or alien - then you might want to go below 35mm and maybe even into the fish eye range. Though if you are below 35mm and moving in on the lenses macro focusing (assuming the lens has it) then you will start to get a lot of distortion in the image even if it is not a true fish eye lens. But this gets back to PHOTOS ALWAYS LIE - think about how you want the photos to lie, that will dictate the lens or lenses you should get.
My goto lens on my Canon 6D is the 24-105mm f4 L which lets me work from wide angle to telephoto with out switching lenses and gives a decent bit of flexibility with the DoF. I also carry the 50mm f1.4 which on the ACP-S sensor of the Canon 7D works at close to 80mm. I also have a pair of the 28-135mm f3.5-5.6 which is sort of Canons better kit lens depending on the body you are looking at. Not a bad lens either for flexibility though on a cropped sensor (as in the Canon 7D or Canon 60D) you have lost the wide angle aspect of it.
I hope this gives you an idea of the things you should consider when choosing a lens. But also remember you get what you pay for. There are plenty of cheep lenses - but they will give you cheep photos as they are not made to a very high standard. An example is Canons 50mm f1.8 which only runs about $100.00, but when you filter your photo through it the loss of quality over even the 50mm f1.4 is obvious let alone the 50mm f1.2 L.

Follow Us

FaceBook

Twitter

Website

Sunday, February 24, 2013

Shooting in Low Light


Crypt - Notre Dame de la Gurde
24mm ISO 200 f3.3 1/30th no flash
Getting good photos in low light can be one of the biggest challenges photographers face. Low light photos require longer shutter speeds larger apertures and higher ISO to get proper exposure, and all of these add their own challenges to the photo. In an ideal world you would have a camera with a large sensor and fast lens to help correct these issues, but lets face it, even those of us that are professionals and “have all the gear” don’t really have all the gear for every situation. We also commonly find ourselves in a situations where we only have basic gear with us because we did not know this opportunity would arise to get this photo.

Lets first look at the challenge of a longer shutter. Shutter speeds over 1/60th start to show camera shake, possibly faster shutters will if you are zoomed in on your subject. Motion blur will also be an issue, and can be even if you can get speeds as high as 1/250th, depending on what your subject is. A couple of options you have to combat camera shake are the use of a support and the use of your time released shutter. If a tripod is available it is the best option as they provide very good support which will eliminate movement of the camera, but you wont always have one, and some places do not allow their use. Learning to brace your camera against your body, elbows in and pulled against the ribcage or squatting with your elbows resting on your knees will help steady the shot. Often the depressing of the shutter release can be enough to introduce shake even when in positions that offer better support. Many cameras have a timed release that can be set to 2 or 10 seconds, use of this delay will eliminate those issues.

Of the three setting on your camera the one that is the easiest to use in low light is a large aperture. Its only real challenge is providing a deep enough field of focus for your subject, the depth of field is increased by moving back from your subject and then zooming in with the camera lens or by cropping the image later on a computer. Todays cameras with megapixel ranges above 12 offer plenty of room to crop. But you can still face other challenges here. Many lenses have a variable aperture, that is the aperture will be something like f3.5 at 18mm but as you zoom in to your subject the aperture drops to f5.6. This means digital cropping later may be your only option for having a deep enough field of focus.

ISO speeds can be the most challenging aspect of low light photography. To the novice ISO will often look like the easy fix and it will be their, or their cameras, response to low light. After all higher ISO lets you shoot in lower light, however this can quickly introduce noise, while a little bit of noise is not that detrimental to an image a lot of noise can destroy it. True there is noise reducing software but it can be expensive and difficult to use effectively. Fortunately newer cameras are better at recognizing and correcting for noise, and if you are shooting with a DSLR it has a larger sensor which is less susceptible to noise. But really the solution for this is experimentation. Shoot a lot of things in low light on different ISO settings and find out what your noise threshold is and what ISO settings are below it. Use these ISO settings and correct the exposure from there with aperture and then shutter speed.

In “The BIG 3” I mentioned that there is really a 4th option - the addition of more light. Generally this will be a novices solution too, turn the flash on. On camera flash is one of the quickest ways to ruin a good photo (I will go into that more when I write about lighting) but also in many places it is not allowed or at the least can be rude - in a cathedral for example. The photo above was shot in the crypt below Notre Dame de la Garde with a Panasonic DMC-ZS10 with available light. The aperture was f3.3 and the shutter was 1/30th of a second, while the ISO was set for 200. This is not a camera with a large sensor or a particularly fast lens, but by bracing the camera on a rail and using the 2 second delay on the time release settings for the shutter I was able to get a very nice image, just with available light coming in from the entrance. This was shot in jPeg and the only post work was the addition of a vignette to help push attention to the sarcophagus.

Conversely when working in a studio it is possible to fake low light. This has the added benefit of allowing the use of camera setting that are normally only available in daylight like conditions (again I will go into this in much more depth later) but the short version is by adding light, usually off camera, you can eliminate the issues of high ISO, large aperture, and fast shutter, but by using light settings that are “under exposed” according to the light meter and then playing with the color temperature settings of your camera you can create the illusion of shooting under candle light or moonlight while using a shutter of 1/100th an aperture of f9 and an ISO of 200.


Follow Us

FaceBook
https://www.facebook.com/pages/Shattered-Images-Photography/274273146947

Twitter
http://twitter.com/Shatteredimages

Website
http://shatteredimagesphotography.com/index.html

Sunday, February 17, 2013

Photographing Breaks


5 Brick Break
5 Brick Break
When photographing martial arts one of the trickiest things to master is getting good pictures of breaking. Here are a couple of pointers that will help. First, timing is paramount and for this reason mastering focus lock is very important. And second it is important to have a fast exposure setting, a fast lens can really help with this and so can the use of flash.

Lets take a moment and look at timing. Timing is having the camera expose at the instant it is needed. If the camera fires to soon the shot will be missed, either the break wont have happened yet or it wont have completed, only part of the bricks or boards will have broken giving the appearance that the break failed. If its to late the person will be standing over a pile of rubble and there will be a cloud of dust, the shot will have been lost. Using focus lock can help alleviate timing issues - especially late exposures. 

When you fire a camera with autofocus you have probably noticed a slight delay from when you decide to take the picture to when the shutter releases. This is because the camera needs a moment to focus. There are a couple of work arounds. On some cameras it is possible to switch to manual focus. However I find focus lock to be the better option. Focus lock occurs in all autofocus pictures, and it is what causes the slight delay in the shutter, causing the shoot to be lost. When the shutter release is depressed the camera focuses on the selected focal point, once focus is achieved the shutter actuates. By depressing the shutter halfway you tell the camera to focus but not fire, once the camera achieves focus it then holds that setting, that is the focus is locked as long as the shutter is held halfway. As I mentioned the camera always does this with autofocus it is just we don’t notice it because we don’t hold it there, in most cases we just fire the camera. With a bit of practice you will find yourself using this technic a lot as you quickly focus the camera, compose the shot, and then release the shutter - and in action photography it will allow you to have the camera ready for the exact moment the action happens.

Fast exposure settings - this should be obvious with a slow exposure you are just going to have a big blur, but how do you get them. The easiest solution is the addition of flash. The addition of more light allows a faster shutter. And in most cases, with the addition of flash, the camera can be set so the ambient light does not effect exposure allowing the burn time of the flash to be the effective shutter speed. In most cases this will give effective shutter speeds around 1/500th to 1/1000th of a second allowing for tack sharp images. A fast lens is also an option to help get faster exposures. Fast lenses have low f/stops 2.8 or below with 1.4 and 1.2 being considered fast. The draw back to this is the shallow depth of field will make proper focusing all the more important. Fast lenses tend to be expensive and with the exception of shooting in sunlight it is unlikely to get shutter speeds as high as 1/250th which is still a bit slow for shooting action. These drawbacks make the addition of flash the best option for action shots.

One last thing, I would avoid spray and pray shooting - that is the use of high frame rates. Most cameras just don’t shoot fast enough and the action will get lost between frames. The Canon 7D can shoot a respectable 7.3 fps some new cameras even manage 10fps making it more likely that an acceptable image will be captured, however your strobe will never keep up, greatly limiting shutter speeds. Also breaking happens so fast it is very likely you will have an image before impact, one after, and still have missed the moment of impact. It is better to invest a little bit of time learning the skills to shoot action. This can be applied to any action, someone breaking bricks or someone pitching a baseball. Learn the timing to get the ball just as it rolls off of the pitchers fingers and you will have the skills to get a break just as the last block crumbles. Just remember there is some travel time between the first brick breaking and the tenth. The timing for a single brick is slightly different from that of a stack.

So as a quick recap. Using focus lock will allow you to compose the image and release the shutter just as it is need. Without focus lock the shot will be too late as you wait for the camera to focus or to soon as you press the shutter early trying to anticipate the moment. Adding flash will allow very fast effective shutter speeds allowing tack sharp images. Mastering these two things will allow you to capture some phenomenal moments, moments that would otherwise be “lost like tears in rain”.


Follow Us

FaceBook
https://www.facebook.com/pages/Shattered-Images-Photography/274273146947

Twitter
http://twitter.com/Shatteredimages

Website
http://shatteredimagesphotography.com/ma_index.html